
Hello everyone!
This is a tutorial showing how to build a spruce with lego utilising weaving of leaf elements to get an organic, natural looking effect.
I came up with this design while building a nature build for a competition, and have since had quite a few requests for a tutorial on this technique. So here it is 🙂
First off, I would like to point out that this technique puts some stress on your leaf elements, especially the top part. Yes, leaf elements are flexible, which is the reason this can be done in the first place, but with time a bit of strain could still possibly lead to cracks or even parts breaking. I have personally never had this happen, but I have also not been utilising weaving for very long. People with longer experience with this style of building has informed me that this can happen. So, utilise this technique at your own risk. The result looks great, but you may lose some elements due to breakage. Just wanted to be clear on that 🙂
So, what are the properties of the tree we are trying to build here?
Aesthetically, I would say this tree is pretty spectacular, but I am of course utterly biased 😉 The foliage has a nice flow to it, and the trunk is natural-looking and has a good texture. The only nitpick is the top, which can look a bit odd from certain angles.
Difficulty to build I would say is quite on the high side. Interlocking leaf elements takes a bit of practice, but is pretty easy once you get the hang of it. Putting all the parts together is the part that takes a bit of experimenting, and will also differ depending on the height of the tree. Be prepared for some frustration here 🙂 The trunk can be made in different ways, but if you choose to use the axe-tree technique which I will be using, then that requires some dexterity and patience as well.
Stability is not as bad as some of my other tree techniques, but it would still be a stretch to call it stable. Much of it comes down to if the final assembly is done well, and if it is then it stays together quite well. I have knocked over my trees quite a few times and they haven’t broken, but sometimes I have to rearrange the branches afterwards.
That’s all well and good, but what pieces do we need for the tree? This depends on what size tree you’d like to build of course, but for the tree we’re building in this tutorial you’ll need the following:
Foliage
38x 5×6 leaves in whatever colour you’d prefer
3x 3×4 leaves (if they exist in the colour you are using)
Trunk
80x droid arms in dark brown
40x axes in black
Support structure (all preferable in some dark colour)
6x 2×2 round plates
1x 4×4 round plate
1x 6×6 round plate (I’m only using light bluish grey because I’ve used up all my other ones 😛 )
9x Axle 2L
1x Axle 4L
9x Straight technic connector
1x Connector end with pin hole
Base
1x 6×6 plate in dark tan
1x 4×4 round plate in olive green
Note: This is just what I use here, most of the time I’d build my trees for specific builds, so then the landscape is the base. Use whatever you want, but it’s good to have something stable during the construction phase.
The trunk
This is basically the support structure for the foliage. Most of it will be at least partially hidden behind the leaf parts, but the bottom will be visible. The trunk will also have an odd feature, which is a round protruding part somewhere in the middle. This is to support the foliage that is added later on.

This is what we need for the base and the support structure.
Now, you’ll notice the two strange cylinders built from droid arms and axes. These are the bark of the tree and the process for building these are shown in my Axe-Tree Tutorial. They can be a bit troublesome to build, but the look nice so head on over and build two cylinders of these sizes before proceeding.
Got the cylinders? Good! 🙂
The rest of the parts are just constructed from bottom to top as arranged in the picture. The result should be the parts shown below.

The pillar is now constructed as shown in the picture.

We can now put on the smaller cylinder which will be the bottom part of the trunk. On top of this we will put the circular part as shown below.
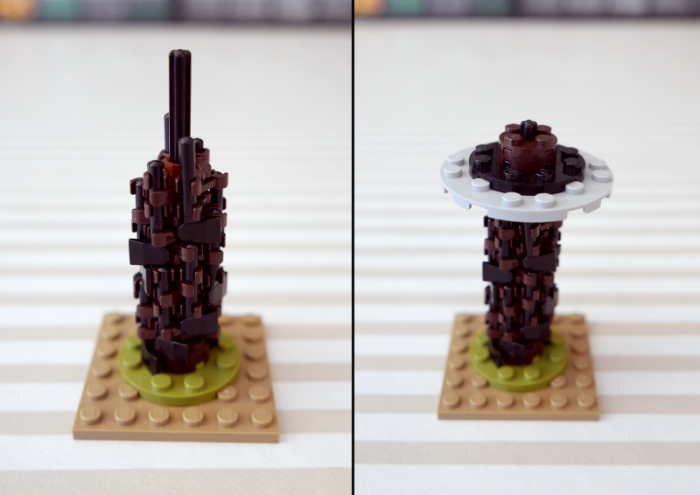
On top of this we will build another, taller pillar with in pretty much the same way as before, and then put on the longer cylinder. Lastly we put a connector end piece at the top. This round shape is what the top leaf part will be wedged around.

That pretty much finalises the trunk.
If you would like to go for a cheaper, simpler and less pretty option you could use 2×2 round bricks with long axles in the center. Coming up with a good solution isn’t too hard but it may have consequences for the stability, as 2×2 bricks are not as wide as the axe-tree cylinders.
The foliage
Now we come to the fun part: weaving leaf elements! 🙂
What we are doing is creating rings of leaves of different sizes that we will then stack on the trunk. These rings are made by interlocking the leaves to eachother as shown below.
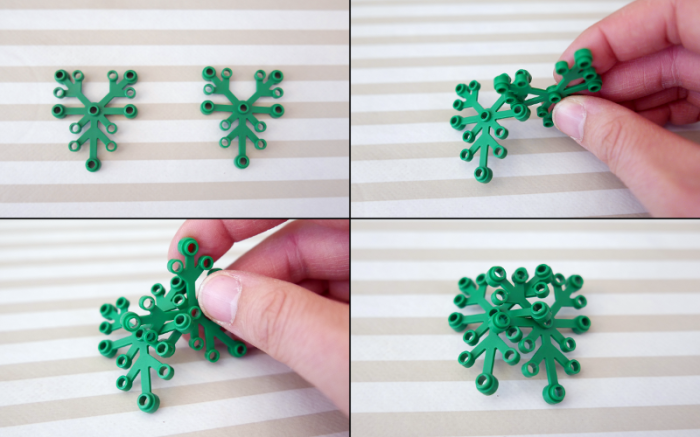
We then continue to interlock more leaves and then finally interlock the two ends to each other to create a ring.
We now have a ring of size 5. This is the smallest size we need. In total we need one ring of each of these sizes: 5, 6, 7, 8 and 9. Construct these before continuing.
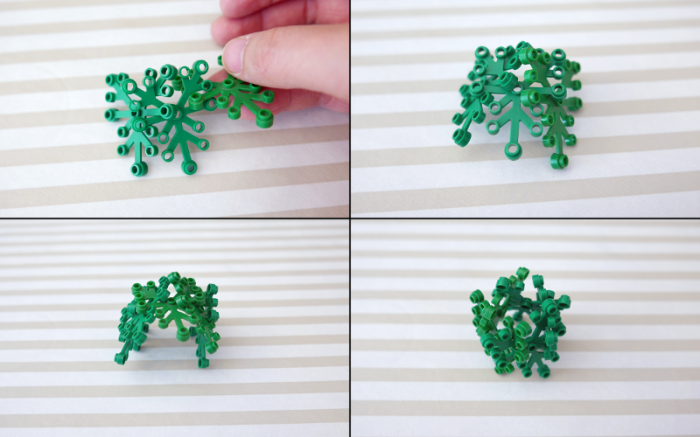
Upon completion the elements in these rings tend to point straight down. However, we want then to point a bit outwards as well. We can make this happen by pushing at the top of the ring with our palm. This will push the leaves outwards, and we will hear a few ‘clicks’ as the leaves shift position. The result can be seen below.

Note that we’re not trying to bend the leaf elements, though they will temporarily bend when we push down. We’re rather trying to get the elements to interlock in a slightly different position where they will point more outwards.
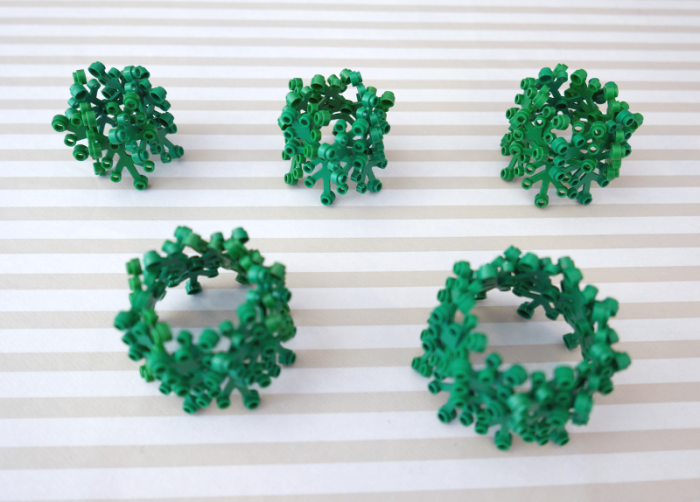
We will do this to all five rings to get the effect below.

Lastly, we also need the top part. This is constructed by weaving just 3 leaves together, but the result is quite flimsy. What we need is for the top points to be pushed inwards and meet together to form the top of the tree. We do this by having pulling the bottom corners out so that they push against each other, forcing the tops to move inwards. There is some tension on the elements here, but it is not very severe. The result should look as below.

Now we are ready to assemble the tree!
First, put the largest ring in place at the bottom, leaning on the round part of the trunk. Make sure that it is balanced and not tipping over to any side. Also, make sure not to push it down hard, because then it might shift from pointing outwards to pointing straight down again. It tends to be the bottom ring that goes out of shape or position, so making sure that it ends up right usually ensure the right shape for the whole tree.
Once the largest ring is in place, take the second largest ring and stack it on top of it. Push down a little bit so that the leaves overlap, but don’t push too hard as it may lose its shape. And again, make sure the bottom ring doesn’t lose position and get too lopsided.

Continue in this manner until all the rings have been put on.

Now we will put on the top leaf part. Just wedge it on top of the connector element of the trunk and it should stay there. It can still move around a bit, but you have to pull in order to take it off again.

If done correctly, the leaves should now sit in place quite snuggly. There is some wiggle room, and you can move things around a bit to “groom” the tree as you would like it to look. Just be careful, because as you move one thing other parts will also be affected. Keep special attention to the bottom ring to see that it doesn’t fall over too much to either side (unless that is what you want).
Don’t worry though, if things go horribly wrong, you just take them off and restack them, which goes quite fast. Perhaps give the rings another palm push and things should work out.
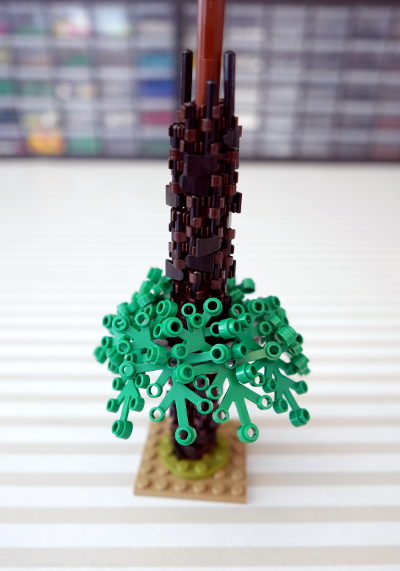
Now the tree is pretty much ready. But you might have noticed that the support is visible through the top part in certain angles as seen below.

If we are using a colour that also have 3×4 leaves, we can use those to cover up this hole.

Much better! If you are using a colour that doesn’t have 3×4 leaves you could use something else, but try to not stray too far from the texture of the leaves. I have used dark green for most of my trees and I have actually left the hole uncovered for those trees, so that’s an option too.
Now, the bottom part where the trunk is connected to the ground doesn’t look too nice. My favourite solution for this is to cover up and distract 🙂 Add some foliage and a couple of nice flowers here and there, and no one is paying attention to the trunk anymore 🙂

So that’s it for the tree! Hope you enjoyed building it and like how it looks 🙂
A note on differently sized trees. If you want to make a taller tree, you would obviously need to make a taller trunk, but also more rings. It takes a bit of experimentation to figure out exactly how many are needed for things to be snug, but not too snug. You may also have to very the sizes of the rings. It is possible to have two rings of the same size on top of each other. This would result in a slimmer tree, and would also be necessary if you are building a very tall tree. Just experiment and you will find what works 🙂
Lastly, to give you a sense of the scale of the tree, who better to demonstrate than the tree guy from the Mountain Police set! (I took the liberty of giving him some hair 😀 )

Feel free to comment or give feedback 🙂 I’m still learning how to make good tutorials, so constructive critisicm is very welcome!
Happy building!


Cool techniques! I’ve been looking for new ways to build interesting trees for my D&D themed MOCs, and I’ve always admired your rendering of foliage. Thanks for sharing your skills. I’ll give this a try soon and tag you on Instagram when I do. Cheers!
LikeLiked by 1 person
Thanks! Glad you enjoyed it and found it useful 🙂
LikeLike
Pingback: Small Spruce Tutorial | Full Plate Builds
I have noticed you don’t monetize your website, don’t waste
your traffic, you can earn extra bucks every
month because you’ve got hi quality content. If you want to know how to make extra money, search for:
Ercannou’s essential adsense alternative
LikeLike
Amazing creation. I would love to make this (and definitely lots of them) but the downside is that it’s very parts intensive, especially finding all those leaves. Your builds are amazing! Do you like nature and green things by the way?
LikeLike
Thank you! Yes, I love nature and green things 🙂
Yeah, you need quite a number of leaves for this unfortunately. But you could make a shorter tree if you have less leaves 🙂
LikeLike