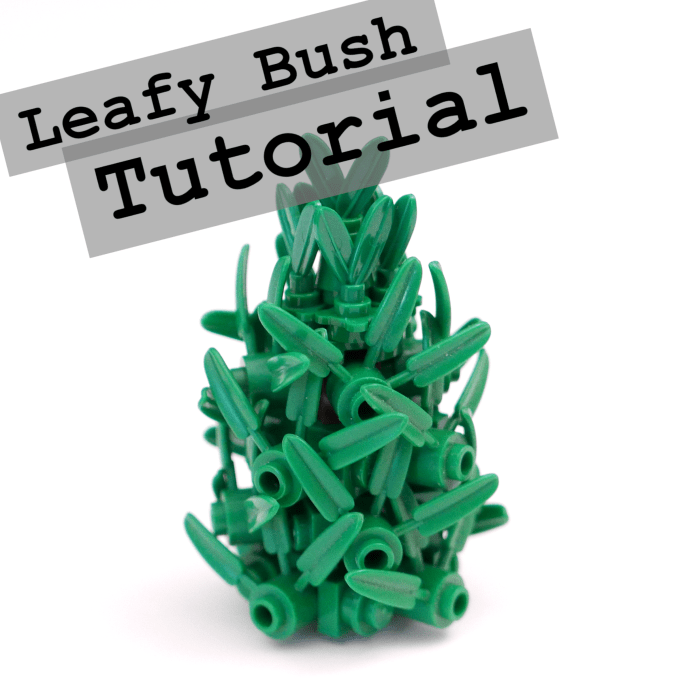
A short tutorial on a type of leafy bush that I use quite often when building landscapes. It’s quite simple and cheap, but looks quite nice and have an organic curve to it 🙂 It can also be built to different heights for variation, and the top can be either rounded or pointed, depending on what look you’re going for.
Here’s a list of what we need:

This is for the rounded top shown in the top picture. If you’re going for a pointy top you just need a green flex spike and another green flower.
The bamboo leaves and the green plumes are the main design pieces in this design and are what we use to create a leafy look.
We start by building the center structure by stacking 4 travis bricks. Each brick is rotated 45 degrees from the previous one as shown below.

Now we’ll add some green in the form of 1×2 plates, but we’ll skip the top layer in order to get a tapered off look. We arrange the plates in a sort of water wheel pattern as shown above. Also, we’ll alternate the direction of the plates between each layer. This first layer is in a clockwise direction, so the next layer will be going counterclockwise, as seen below.

We then finish up with the bottom layer which will again be clockwise.
Small note:
If you are building multiple bushes it could be good to add some variation to the directionality, which means for some you can instead start with counterclockwise and the alternate from there. This will affect the subsequent steps of the tutorial, but making adjustments should be easy – left is right and right is left essentially 🙂
Before we dress the tree in bamboo we should add the top, as it is slightly harder to add it afterwards.

We’re putting four flowers on a 2×2 round plate to provide some small pinholes to attach the plumes to. Don’t push the flowers in too firmly, since it will then be harder to attach the plumes.
Once we’ve attached the four plumes we’ll add the centerpiece, which is a plume in a 1×1 cone. If you would like a pointier top you can instead use a flex spike in another flower.

We then attach the whole thing to the top of the tree as seen above. We can now move on to attaching the bamboo.

Each layer will have 4 bamboo pieces attached to it. The bamboo is attached to the centermost stud of the plates (the other stud sticking out is just there to add fullness to the tree).
The key thing to pay attention to here is the angles of the bamboo. For the first and second layer, the bamboo is tilted a bit to the right, but slightly more so for the first layer.

The third layer is tilted to the right as well, but the fourth layer instead tilts to the right, as seen in the top two pictures above.
Lastly, I like to add 1×1 round plates on the empty stud of the bottom layer, as there is no bamboo leaf covering it from below and I feel it ruins the roundness of the base of the bush otherwise.
That is essentially it, and the the finished product should look as in the bottom left picture above. The bottom right is the same bush but with a pointy top.
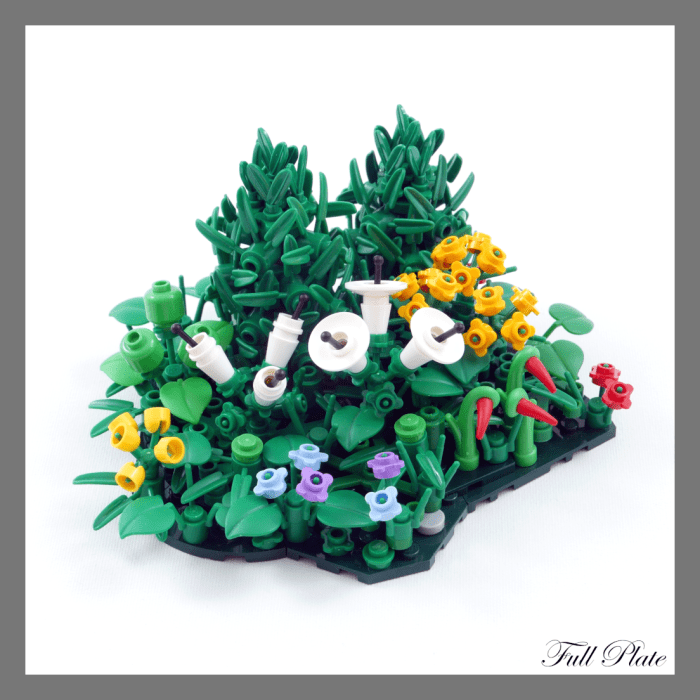
An example of the bush used in landscaping, from one of my previous builds. Being colorless the bushes do not draw the eye here, but rather they provide a nice base and contrast to the colorful elements of the build.
That’s it! Hope you enjoyed the tutorial, and good luck with your building 🙂


